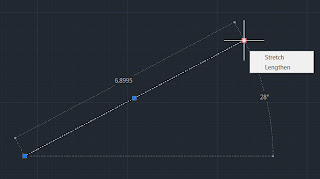
In this Click Saver article, I want to talk about some really nice enhancements in 2012 using grips. In the past, when using grips, a lot of the options were done through the right-click; but, starting in the 2012 release, hovering over the grip gives us new abilities.
The first one to look at is using grips on a line. Select the line and move the pointer over the grip at the end of the line, but don’t pick it. If you click it, you will activate stretch command. By hovering over the grip, you will see a pop up menu with the option of lengthen. So, how is lengthen different than stretch? Lengthen locks the angle that the line was originally drawn at. You can also choose lengthen by picking the grip and then pressing the [CTRL] key on your keyboard to cycle between the commands.
Another click-saving feature that was slipped in is using grips on dimensions. By hovering over the dimension arrow you can quickly continue the dimension, create baseline dimension, or even flip the arrowhead.
Now, you can consider how this might help you with other objects in AutoCAD such as arcs, polylines, multi-leader, multiple-sided viewports and more.
10 Benefits of Using Auto CAD Layout
Getting to know Pro Engineer
How to Maintain Attribute remain in the Middle Block
Grip Options on the AutoCAD 2012 Platform
Publish AutoCAD layouts to multiple pdf file
Squeeze or stretch single-line text to fit
Differences Between Extrude, Revolve and Presspull
How to Maintain Attribute remain in the Middle Block
Select All Horizontal and Vertical Lines on In Pictures
Close up of Blue Prints from Angle
RELATED POSTS
Getting to know Pro Engineer
How to Maintain Attribute remain in the Middle Block
Grip Options on the AutoCAD 2012 Platform
Publish AutoCAD layouts to multiple pdf file
Squeeze or stretch single-line text to fit
Differences Between Extrude, Revolve and Presspull
How to Maintain Attribute remain in the Middle Block
Select All Horizontal and Vertical Lines on In Pictures
Close up of Blue Prints from Angle


